Email Integration

Configure Email Server Authentication

Code Customization
Configure Email Server Authentication
Description:

There are three basic methods for configuring your email server to send email messages from your application:

  1. Use the built-in SMTP Email Server available in Windows Server. This option requires configuring the SMTP server as described below and is the recommended solution.
  2. Provide username / password authentication. This option uses the underlying SMTPMail class in ASP.NET to send out email. This is described in multiple places on the web, including: http://www.eggheadcafe.com/PrintSearchContent.asp?LINKID=622.
  3. Configure your email server to accept "relaying" of email. This option potentially exposes your server to spammers, and we strongly discourage you from doing so. Typically, an email is sent through an email server, the mail server requires authentication. If the email server did not require authentication, then it is called an email server with an "open relay", which means anyone can then use your email server to send out email messages. This is one of the biggest problems on the Internet because "open relays" are used by spammers to send out emails without getting caught. Because it is not their server sending the emails, an unsuspecting company's email server is hijacked to send out emails.

Option 1:   Configure these components to enable email server authentication on your system:

  1. Your application’s Web.config file.
  2. SMTP server on your system to allow relaying to itself.

Configuring Web.config

Step 1:  Locate the Web.Config file for your application, e.g.:

C:\<Application Name>\Web.config

Step 2:  In Web.Config, modify the following lines:

<smtp from="[email protected]">
	<network host="mailserver" port="25" defaultCredentials="true" />
</smtp>
	

Replace "mailserver" with either (a) your machine's name or (b) the fully qualified domain name of your machine, e.g. computer or computer.mydomain.com, and [email protected] to your desired email address

Modifying your SMTP Server Configuration

By default, the Windows SMTP server does not allow relaying. In order for your application to send emails, you must enable relaying to the computer itself. This solution opens up relaying to the local server 127.0.0.1 only, so it is not open to everyone. The 127.0.0.1 is a local non-routable address that designates the machine you are using. This instruction and images describe the process for IIS v6, for other versions please refer to Microsoft documentation, such as
http://www.iis.net/learn/application-frameworks/install-and-configure-php-on-iis/configure-smtp-e-mail-in-iis-7-and-above for IIS 7.5. The process logically is the same, but IIS UI is different

Step 1:  Open the IIS Console (Start -> Settings -> Control Panel -> Administrative Tools -> Internet Information Services)

Step 2:  On the left pane of the IIS Console, expand the computer icon.

IIS Console

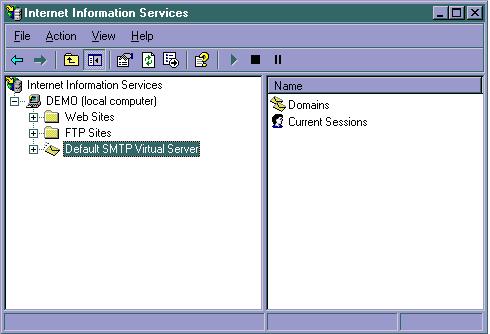
Step 3:  Right click on "Default SMTP Virtual Server" and select Properties.

IIS Console

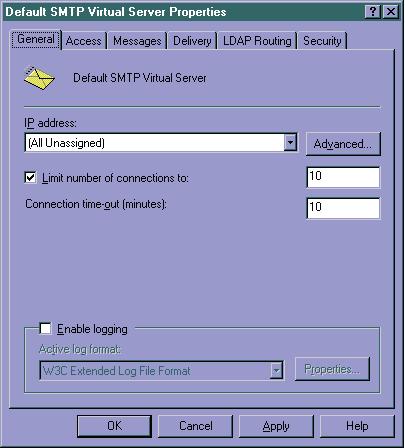
Step 4:  In the Properties dialog, select the Access Tab.

IIS Console

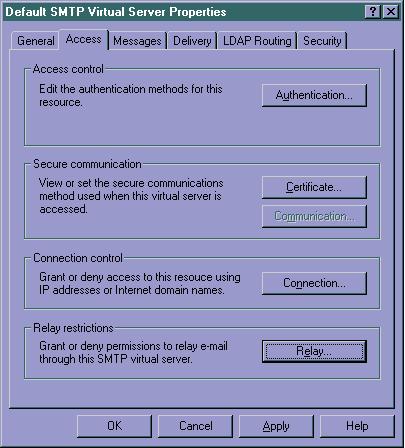
Step 5:  Select “Relay…”.

IIS Console

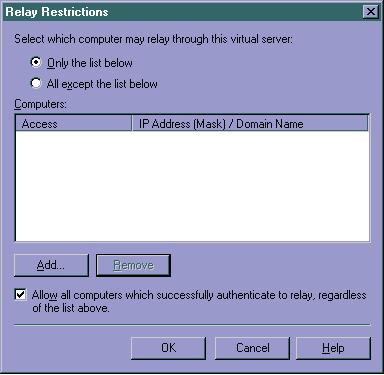
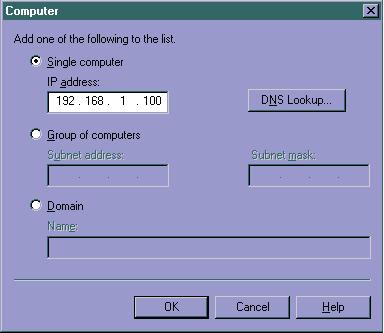
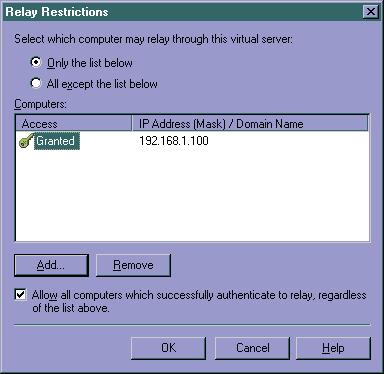
Step 6:  In the Relay Restriction dialog, add the IP Address of your system. Make sure the "Only the list below" option is selected. This will effectively allow your machine to communicate with its own SMTP server so emails can be sent.

IIS Console

Step 7:  Click OK to accept the changes.

IIS Console

Step 8:  Click OK until you've closed all the dialogs. Your application can now send emails.

Disclaimer:
Customizations included in this wizard are provided as a sample to demonstrate a feature, and may work only in specific situations. The Iron Speed Designer support team cannot assist in the resolution of problems which may occur as a result of customizing your application or modifying a customization to fit a particular purpose.

Terms of Service Privacy Statement